Knowledgebase : Technical, Configuration and Devices > Email

Emails can be sent through Office365 email servers using either:

  • Authenticated Client SMTP, or
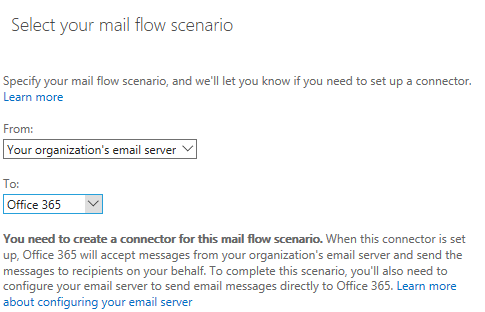
  • SMTP Relay (using an Outlook connector)

Authenticated Client SMTP is the preferred option. SMTP Relay may be deprecated by Microsoft

Authenticated SMTP

Authenticated SMTP requires authentication to be enabled at the Microsoft 365 Tenant and the Mailbox level.  It is now enabled by default.

The per-mailbox setting to enable (or disable) SMTP AUTH is available in the Microsoft 365 admin centre or Exchange Online PowerShell.

  1. Open the Microsoft 365 admin center and go to Users > Active users.
  2. Select the user, and in the flyout that appears, click Mail.
  3. In the Email apps section, click Manage email apps.
  4. Verify the Authenticated SMTP setting: unchecked = disabled, checked = enabled.
  5. When you’re finished, click Save changes.

In SPM/PHM configure the options in Setup > Provider > Email   (for each Provider)

SMTP Server Settings

SMTP Server Name:    smtp.office365.com (or outlook.office365.com)
SMTP Encryption:       TLS
SMTP Server Port:      587  (needs to be an open Outgoing port)

Account Authentication

SMTP Authentication required
Authentication Method:     AUTO or LOGIN
Account Username:          The email address of a user account
Account Password:           The password for the user account

Note:

Enable SMTP AUTH for specific mailboxes

The per-mailbox setting to enable (or disable) SMTP AUTH is available in the Microsoft 365 admin center or Exchange Online PowerShell.

  1. Open the Microsoft 365 admin centerand go to Users > Active users.
  2. Select the user, and in the flyout that appears, click Mail.
  3. In the Email appssection, click Manage email apps.
  4. Verify the Authenticated SMTPsetting: unchecked = disabled, checked = enabled.
  5. When you’re finished, click Save changes.


SMTP Relay

In SPM/PHM (release 409.6 or newer) configure the options in Setup > Provider > Email   (for each Provider)

SMTP Server Settings

SMTP Server Name:    <your-domain>.mail.protection.outlook.com
SMTP Encryption:       TLS
SMTP Server Port:      25  (needs to be an open Outgoing port)

Account Authentication

SMTP Authentication NOT required

Troubleshooting

  • Use the Check Connection and Send Test Email.
    Look at the log as it will explain the problem.  Scroll to the bottom of the log for the most recent entry.
  • Check port 25 or 587 are open  (Use Telnet if you are not sure)
  • Check .NET Framework 4.8 or newer is installed.
  • Get your Office365 administrator to go to the Azure Active Directory and check the Sign-In logs to view the connection attempts.

Most SMTP (Outgoing) email servers now require you to have specific features enabled with your smtp account login, so that the receiving email server can trust the content in the email and that it is not likely to be spam.  If it is not configured correctly you may be getting the following error when you send an email:

The best option is to ensure that your domain name has the correct DMARC, DKIM & SPF settings (talk to your IT provider to check these are enabled).

If you are using the SMTP2GO outgoing email service, you should also use the DMARC/DKIM/SPF settings, but you can also just verify the FROM: email address that you are using to send your emails with.  Note that the domain verification is preferential as the single email verification will include the words "via smtpcorp.com" in the header area of the email.

To check whether the SMTP2GO account is verified:

  1. Login to your SMTP2GO account
  2. Go to Sending > Verified Senders
  3. The first view is of your 'Sender Domain' status.  If the domain is verified it will appear with a green background, otherwise it will be orange


    Use the 'Add Sender Domain' button for the details that your IT provider will need to add.

  4. You can also click on the 'Single sender emails' link

  5. Use the 'Add single sender email' button and enter the email address that you are sender your emails from.  Then check that you have received the email and click on the Verified option in the email.


    It will then appear in the SMTP2GO screen as being verified

Most of the major email servers will look at the domain name part of your email address to check that the correct security settings are included in the email header to allow the email server to authenticate that it is from a genuine email address and not created as part of a spam storm.  The first two steps below are the most important.

  • Try to use the same domain name for your 'From' address, 'Reply-To' address and also the 'SMTP Server Name' (Setup > Provider > Email).  Some email servers will compare the domain names used in the out-going email and if they differ they rank the email for spam accordingly.
  • Add the relevant DMARC, SPF and DKIM settings to your domain host (talk to your IT provider) - this is very important.

Additional options to check the deliverability of your email.

  • If you have a @gmail.com address, create a free account at Google Postmaster Tools. This will give you the ability to see various metrics that Google/Gmail keeps for your domain name and will let you see if there is a problem. Note: it will take a few days for any stats to appear after you create an account with them.
  • Check that your domain name isn't on a domain blacklist.  You can search for your domain name at MXToolbox. Also search for your domain name at URLVoid.
  • Search for your domain name at BorderWare Watchguard. This will show BorderWare's assessment of the reputation of all IP addresses that are sending emails from your domain name. Any servers that have a bad reputation may have become compromised, or may be sending out emails that have generated spam complaints in the past, and should be investigated. You can do a similar search for your domain name at SenderScore.org.
  • If you're sending from a free email service such as Hotmail, Yahoo, etc. your emails are often treated more suspiciously by recipient spam filters. It is always better - and more professional - to send emails from your own (or your business') domain name. You should never send emails from a Yahoo or AOL email address (as of April 2014) as these domains are now restricted by their DMARC policies. You should also not send from a Gmail email address as of June 2016 due to Gmail's new DMARC policy.
  • If you place links in an HTML email, it is best to not display the actual link (http://www.etc...) in your email. Many email programs now have anti-phishing technology which treats such links suspiciously. If the underlying URL of your link is different from the URL displayed, then your email will be marked as spam by email clients such as Thunderbird. And never use an IP address in a link.
  • Never use URL shorteners in an email.

You can test the likelihood of your email being regarded as Spam by using email checking sites such as https://www.mail-tester.com/   You will be provided with a unique email address like test-ilg76rjn5@srv1.mail-tester.com  that you can put as the patient's email address and then try sending emails from different locations in the Incisive application.  You will be provided with a score.  Anything with a score of -5 or less is likely to be marked as Spam.  Scores of -1 or -2 should see the emails successfully delivered to the recipient's Inbox.

If you are using the SMTP2GO service to send out-going emails, to improve the deliverability of emails so they don't land in the Junk-mail inbox, you will need to add CNAME records to your domain host service provider.

Your domain needs to be added to the 'Verified Senders' function in SMTP2GO > Settings, then make the changes to your DNS host.

For example

In order to improve your delivery rates, we always recommend creating an SPF record and a DKIM record in your DNS settings. By doing so, this tells the recipient server that you have given our servers permission to send on your behalf. Without these small changes, recipient servers may flag your emails as spam and either dump them in the junk folder, or else just not accept them at all.

SPF (Sender Policy Framework) records tell the recipient server that you have given SMTP2GO’s servers permission to send on behalf of your domain name. A DKIM (Domain Keys Identified Mail) signature digitally signs your emails so that your particular domain name can claim responsibility for the email sent. If you haven’t set up a DKIM record, SMTP2GO signs your emails with our domain name. Gmail recipients will see that emails are sent “via smtpcorp.com” or “via smtp2go.com” and you may experience some issues when sending to some recipient servers such as Hotmail/ Yahoo/ Gmail and AOL. If you need to set up a DMARC record (which is useful to prevent spammers sending phishing emails from your domain name) then you will absolutely need to create a DKIM signature.

Microsoft now requires third-party applications, that want to import emails from a Microsoft 365 (Office 365) IMAP service, to use an access token for authenticated connection requests. Basic Authentication, which uses a Username and Password, is no longer supported by Microsoft.  The Incisive application will automatically recognise whether the Microsoft account is configured to only allow ‘Managed Authentication’ connections.

You need to register the Incisive application in your Azure Active Directory tenancy, that hosts your Exchange Online and grant it permissions. The AppID and Secret Value, of the app you register, are required for SPM/PHM to access the Microsoft 365 account.

The steps required are:

  • Register the ‘Message Centre’ as an App

  • Assign Users & Groups to the App

  • Assign Permissions to the App

  • Create a Secret

  • Enter the App ID and Secret into the Incisive program

Detailed instructions to configure the Azure portal are available from:

https://incisivesupport.com/docs/Microsoft365_OAuth2_Config.pdf

You can add 'alias' email accounts to Gmail and Office mailboxes, without them costing anything.  The incoming emails, addressed to the alias accounts, will all appear in the main mailbox account.

The MFA function for Incisive inCLOUD requires a unique email address for each inCLOUD account and if you don't have individual practice emails or you don't want to use a personal email, you can easily create additional alias accounts.

Google Gmail

Send emails from a different address or alias - Gmail Help (google.com)

How to set up Gmail or Google Workspace (G Suite) aliases – cloudHQ Support

Microsoft Office

Add another email alias for a user - Microsoft 365 admin | Microsoft Docs

See Sending emails using Apple's SMTP service for icloud.com or me.com email accounts.

If you are using Apple's icloud.com or me.com SMTP service to send emails from Incisive applications, you will need to create an 'App-Specific' password to use for the Authentication password.

In Apple's words "App-specific passwords are passwords for your Apple ID that let you sign in to your account and securely access the information you store in iCloud from a third-party app. For example, use app-specific passwords with mail, contacts, and calendar services not provided by Apple."

https://support.apple.com/en-us/HT204397

If you follow the links in the above page and log into your apple account you can find the option to Generate Password...  for App-Specific Passwords.

5Y9znGE2uBwAAAAASUVORK5CYII=

You can have up to 25 App-Specific passwords.

The SMTP settings you need to use are available for your icloud.com or me.com email address from the following URL

https://support.apple.com/mail-settings-lookup

Microsoft and Google are changing the connection requirements for third-party applications (like Incisive) to send emails through their SMTP (out-going) email services.  These connections now require a token to be requested and passed back to Incisive application, instead of just requiring your encrypted login & password, for the Microsoft & Google services to allow the email to go through.

Previously, Gmail had an option to allow 'less secure' applications to send emails through their SMTP service, however this option has now been disabled.  There is a different security option called 'App Password' which may work for you, but is only available if you have 2FA authentication enabled on your Google account.

Google Support provides the following knowledgebase article https://support.google.com/accounts/answer/185833?hl=en