Knowledgebase : Training

The Message Centre has multiple functions to help you manage your message and files.

Read an Overview of what it can do.

View these short videos demonstrating some of the functions of the Message Centre

The Integrated edition of SPM & PHM provides a new interface to the applications.  The underlying functionality remains the same (or is improved) so it is relatively easy to transfer your work processes from one-to-the-other.

View this document to show the difference between the Classic and Integrated editions.

The following video demonstrates some of the main features of the SPM & PHM menu.

http://incisivesupport.com/train/vid/menuoptions.mp4 (7:36 mins)


For more detailed explanation of the options available when using the menu, go to:
Help > SPM/PHM Help then navigate to Basic Concepts or click here


One of the main improvements that comes with the Integrated edition is a much finer level of access rights can imposed so that you are able to restrict staff from viewing or changing information that they do not need to have access to.  This involves taking some time before you start using the Integrated edition is establish the permissions and roles that you want to use.  To make it easier for you, we can provide a set of commonly used permissions and apply these for you.

To give you a better idea of how the Permissions are used you can view the following documents:

or view the following video on how to configure the menu Permissions and allocate Roles.

        http://incisivesupport.com/train/vid/setup_permissions.mp4


New invoicing items can be easily created from the Medicare Benefits Schedule items using the 'Make Codes' option in Setup > Financial > Charges > Invoice Items.

You are able to select either a single item of a range of items from the Medicare list.

A short video (2.04mins) demonstrates the steps to perform this function. 

http://incisivesupport.com/train/vid/Invoice_MakeItemsFromMedicare.mp4 

Note: 

You are better to run the 'Make Codes' option several times with smaller ranges of Medicare Item numbers rather than enter one large range, i.e. 30,000 to 70,000. The latter would result in Invoice Codes being made for all Medicare Item numbers in the range and will markedly slow down the invoicing system for you.  Once the range of items have been imported they can only be deleted individually.

Only import the Medicare Item numbers that you require for your specialty or sub specialty. More can be added if necessary.

While you cannot email in bulk to patients out of the Incisive application, you can export a CSV file and use this to email from other applications.

Obtaining the data file

Our recommendation for obtaining the data file of recipients would be to base this on your appointments in a period.  Currently many people are feeling bombarded with emails from all directions regarding the virus.  Rather than targeting a large number of patients, i.e. everyone in your database, it is probably beneficial to limit this to patients who have had an appointment in the last year at most, or perhaps only those with a future appointment.

In a group practice, it is advisable that a single email be sent rather than patients receiving an email from multiple doctors in the practice if they have had appointments with more than one provider.

To obtain a file as the basis for your Mail Merge:

--> Reports - Appointment - Appointments in Period / Appointments in Period (Current Provider)

If you are running the first option, leaving 'Current User Only' unticked will report across all providers that you have permissions to.

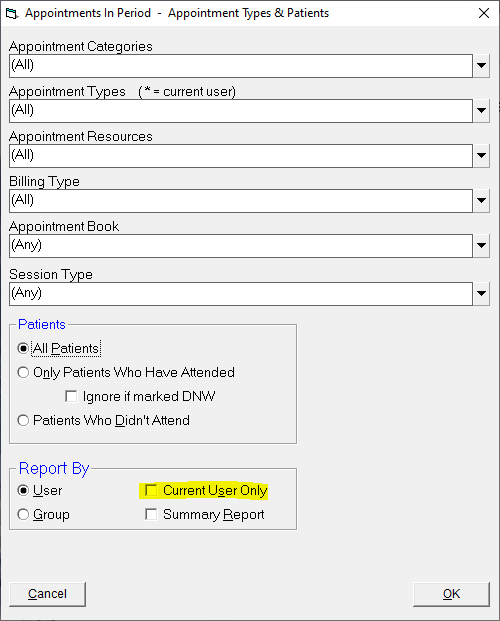
After selection of the date range (remember to set this far enough into the future to cover your upcoming appointments) the report will come to screen.

Use the [M] Mail Merge option in the menu bar to save the file.  Note, using this option if the patient has had multiple appointments they will only be listed the once, irrespective of how many providers have seen the patient.

Please note that the Mail Merge option does not filter out any patients marked as deceased.  If you require a file that excludes deceased patients then please contact us.

Mass Email Software

The following applications can be purchased to perform a bulk mail out:

  • Constant Contact – Best email service provider. https://www.constantcontact.com/nz/home-page
  • Sendinblue – Best bulk email service for beginners. https://get.sendinblue.com/
  • Mailchimp – Best all-in-one marketing automation suite. https://mailchimp.com/

Microsoft Office

If you have a Microsoft Office this should have a Mail Out feature.  The screen shot below is from Microsoft Office Professional Plus 2013.

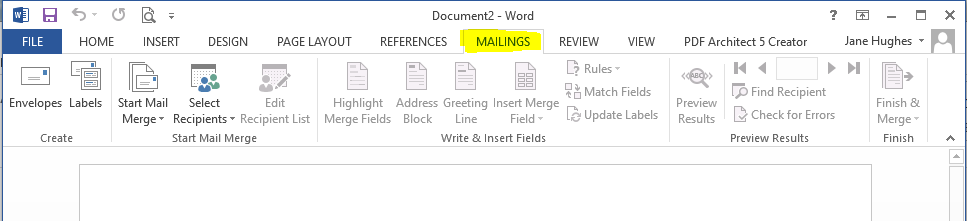
  • Use ‘Select Recipients’ to navigate to your data source.
  • Once your data source file is selected you can then use the ‘Edit Recipient List’ if required.
  • To customize the email you can ‘Insert Merge Fields’ into the document, however, we recommend that you limit the amount of data to limit identifying the patient.
  • To see what will be sent, use ‘Preview Results’.  Once you are happy with the output, you can continue with the mail merge.
  • Once your letter / email is typed, use ‘Start Mail Merge’ selecting the email option.
Field Forms is a form that is designed to be used with selection controls, such as check-boxes or drop-down lists, instead of just text.

You can insert the image of a paper form in the background and then position the controls on top of the form so that it appears like a paper form but is used and saved as an electronic form.

Incisive have provided you with a library of commonly used forms which you can download and use in your practice or hospital.  You can also either modify these forms to better suit your practice or hospital or you can create your own custom forms.

Common forms are:
  • Consent for treatment approvals
  • Booking form
  • Consult slips
  • Test orders
  • Blood or product requests
  • Nurse checklists

Click on the following link for a short instructional video on how to use the Field Forms.

            Video: Field Forms - downloading and using Field Forms  (4:05)

There are a number of different ways of selecting a patient in the Patient module.

This training video provides a view of the common methods used to select a patient and also gives an explanation of the information displayed in the Patient Header.

      http://incisivesupport.com/train/vid/patientselection.mp4  (2:35 mins)

Online forms can be completed and submitted by patients using the inFORM application.

The submitted form is an XML data file which is delivered to the practice or hospital server.

The submitted data needs to be viewed and verified by a person to make sure that the information is valid and is of sufficiently good quality to be allowed to be imported to the patient's record in the database.

The Importing and Validating of the form data into SPM or PHM is explained in this short training video:
      http://incisivesupport.com/train/vid/inFORM_ImportXmlData.mp4 (3:18 mins)


One of the main improvements that comes with the Integrated edition is a much finer level of access rights can imposed so that you are able to restrict staff from viewing or changing information that they do not need to have access to.  This involves taking some time before you start using the Integrated edition is establish the permissions and roles that you want to use.  To make it easier for you, we can provide a set of commonly used permissions and apply these for you.

To give you a better idea of how the Permissions are used you can view the following documents:

or view the following video on how to configure the menu Permissions and allocate Roles.

        http://incisivesupport.com/train/vid/setup_permissions.mp4  (3:42 mins)

You are able to pay-off multiple invoices easily from the same payment using the Group Receipting function.

Follow the short video to see an overview of the steps involved.

http://incisivesupport.com/train/vid/office_groupreceipt.mp4   (2:13 mins)


Click here for more detailed information on Group Receipting

Tasks are message types that have a Start or End date and remain active until they are marked as Completed.

You can create tasks for yourself or you can assign to others.

Tasks can be linked to a patient and also message or file.

The following training video provides an overview of creating and completing a task.

http://incisivesupport.com/train/vid/mymail_maketask.mp4 (3:02 mins)


Histology, Pathology & Radiology results can all be imported into the Incisive application.
 
Once they have been imported, you can choose how you want to review and action the results.  These are some of the methods used:
1. Doctor reviews the result and manages ALL the ensuing actions.  
2. Doctor reviews results and sets TASKS for the staff to action.  
3. Normal results are reviewed by the NURSE; Abnormal results are reviewed and actioned by the Doctor. 
4. SECRETARY processes all results to the patient's Notes and informs doctor if abnormal.
 
You can choose the method that works best for you.
 
The following video shows the steps involved with option 1.

Training tutorials for basic functions in SPM

These are some tutorials for the use of some basic functions in SPM.


From the Appointment Book, patients can be sent a SMS txt or email with a link to a questionnaire in the inFORM online application which can use to complete COVID screening questions from their phone.  Here is an example

You can, of course, include the link to the online form with your appointment reminder, which was explained in this article.  However, if you want to send the questionnaire out a number of days prior to their attendance, you can choose the Session and click on the SMS button in the Toolbar.

Video tutorial

The following link is a short (59 sec) video showing the steps to send a SMS with a link to the COVID questionnaire, then import the patient's answers so they display in their Notes

http://incisivesupport.com/train/vid/covidscreening.mp4

Use QuickText

To make it quicker to add the relevant text into the SMS message we recommend that you create a QuickText template in Setup > Templates > Letters.  Add the text, merge codes and URL (hyperlink) to the online form, then when you want to insert the text into the SMS message just press the F8 key and select it from the list.

The hyperlink to the COVID questionnaire can be shortened so it uses fewer characters in the SMS.

https://forms.incloud.clinic/demo/startup.aspx?f=r&q=c19nzname can get shortened to http://go.incloud.clinic/reply2dr 

inFORM online application

The inFORM web application can be used for a number of functions, including online patient registration, but for this purpose, because you already have the patient registered, it is configured just to ask the COVID screening questions.  The questions are based on those provided by the Ministry of Health, but they have been slightly modified by us.  If you want to ask different questions these can be customised for you.

Further information about the inFORM application is available from this link or you can send a request to help@incisivesupport.com