The Schedules tab displays all current bulk bill schedules (Medicare and DVA) that have not yet been advanced, plus schedules that have been processed (submitted electronically to Medicare) and which have not yet been receipted and reconciled.
- CREDIT Schedule
- EDITING OR DELETING ENTRIES ON A SCHEDULE
- PROCESSING
- RECONCILING PAYMENTS FOR SCHEDULES
- AUTOMATIC RECEIPT AND RECONCILE HIC SCHEDULES
- RECEIPTING AND RECONCILING MATERNITY SCHEDULES
- ACC QUERY
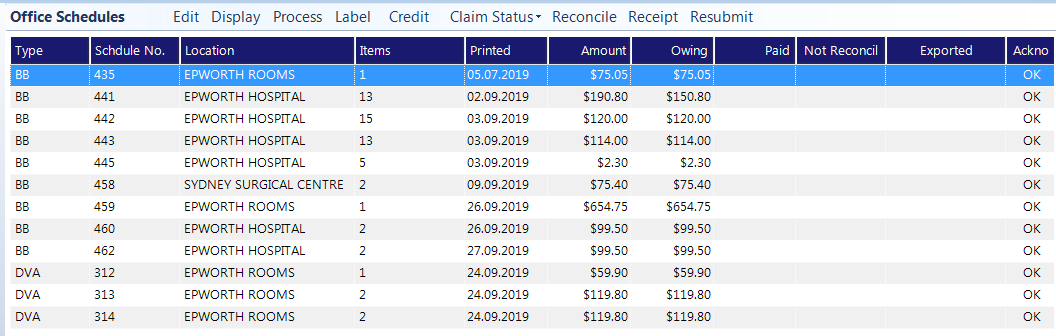
The Schedules Tab displays all current schedules (ones being written to) and schedules that have been sent off for payment.
Edit | Edit schedules that have not been advanced. |
Display | Display any previous schedules. |
Process | Process schedules, print schedules or schedule reports. |
Label | Print Labels LABELS |
Credit | Credit items claimed on advanced schedules. |
Claim Status | Enables you to get a processing or payment report from Medicare regarding the highlighted schedule. |
Reconcile | Reconcile the highlighted schedule. |
Receipt | Enter a payment against the highlighted schedule. |
Resubmit | Allows you to resubmit a medicare schedule. |
Edit
- Highlight the schedule you wish to edit.
- Select Edit.
- Delete or put items on hold as required.
Select Close to save the changes to the schedule.
Hold
This option allows items to be temporarily removed from the current schedule so that it can be advanced. Held items are then moved on to the new schedule. They are no longer marked as being on hold.
- Highlight the entry to be placed on hold.
- Select Hold.
- Select Yes to confirm the entry is to be placed on hold.
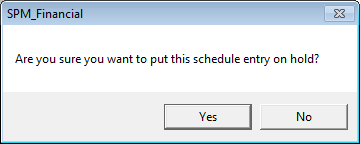
If you want to remove the hold status, select Hold a second time and select Yes to confirm you wish to remove the held items.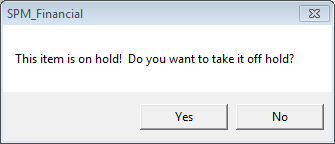
All items within the claim for the patient will be placed on hold if they were entered on the same bulk bill claim.
Multiple lines can be selected by holding down the Shift key and selecting with the mouse or arrow keys.
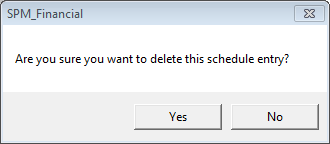
Delete
Unlike the Hold option, Delete will permanently remove the items off the schedule.
- Highlight the entry to be deleted.
- Select Delete.
- Select Yes to confirm the entry is to be deleted.
Display
This option allows schedules other than the current ones waiting to be processed and those schedules that are outstanding to be displayed.
- Select Display.
- Select which type of schedule you want to display.
- Select the Status of the schedules that you are wanting to display.
- Select OK.
- The selection will appear on screen.
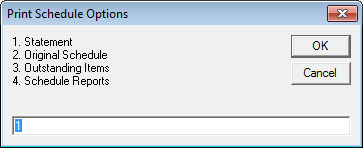
Process
The Process option will behave differently depending on whether you have selected to process a schedule that has not yet been advanced, or one that has already been processed.
Print Schedule Options
Label
Allows for the printing of selected labels.
Credit
Credit entries are adjustments. They reduce that amount outstanding on the schedule.
A credit entry should only be entered when the items claimed are not going to be paid.
You will not be able to enter a credit entry if there is a payment against the schedule that is still to be reconciled.
- Enter the amount to credit against each patient in the $Credit Column.
- Select OK to apply the credit entries to the selected patients.
- Select Yes to confirm the credit entries are to be applied to the selected patients.
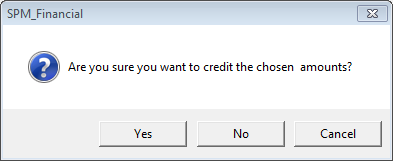
- If the credits applied clear the remaining balance from the schedule then it will be removed from the Schedules tab.
Claim Status
Bulk Billing Medicare0
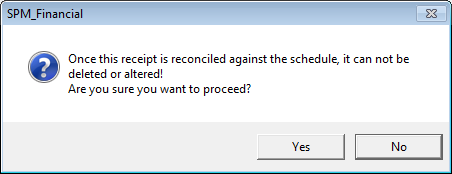
Reconcile
Schedule that are still to be reconciled will appear in the list with a tick in the 'Not Reconciled' column.
- Select the schedule to reconcile.
- Select Reconcile.
- If there is more than one payment to be reconciled, select the first payment followed by OK.
- The outstanding entries will be listed.
Allocate the payment to the appropriate entries.
This should be done by referencing your Remittance Advice / Payment Advice.It is imperative that you correctly allocate the payment to the correct patients and services.
- When the Total Paid (bottom of screen) matches the amount paid (top of screen) select OK to save.
- Select Yes to confirm you wish to proceed only if you are sure that the details entered are correct.
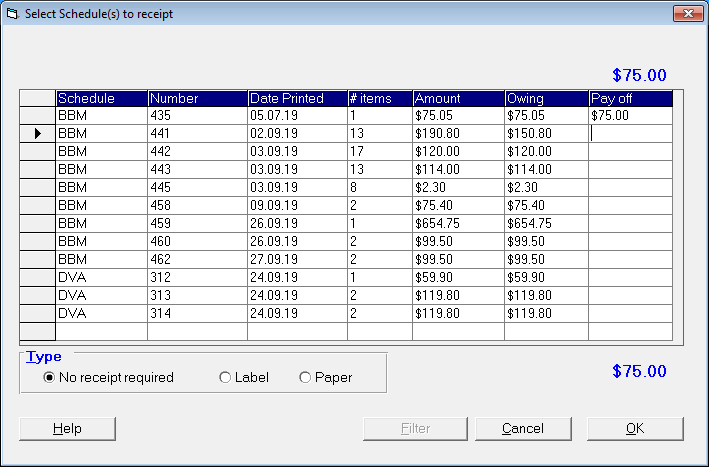
Receipt
This option allows for the manual receipting of bulk bill schedule claims.
Upon completion of the payment details, allocate the payment amount to one or more outstanding schedules.
Resubmit
This option allows you to copy the contents of a schedule that has been advanced (but not paid, or had credit / adjustment entries applied) to a new schedule so that changes can be made before processing.
Prerequisites:
- There is no other schedule not advanced for the same schedule type.
- There have been no payments made against the schedule you are wanting to re-submit.
- There have been no credit entries applied against the schedule you are wanting to re-submit.
To resubmit a schedule:
- Highlight the schedule to be re-submitted.
- Select 'Resubmit'.
- You will be prompted to confirm that the schedule is to be copied.
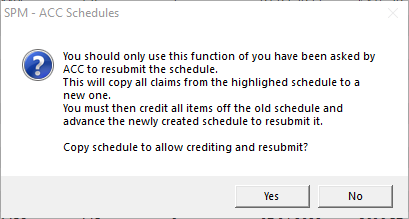
- If you are sure, select 'Yes'.
- The following message will display.
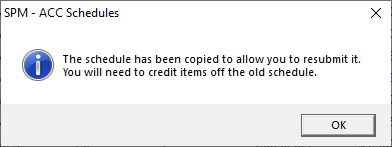
- A new schedule is created.

- Edit the new schedule and delete entries that are incorrect, or put them on hold.
- Process the remaining entries on the new schedule and close off in the usual way.
- Once the new schedule has been advanced, credit all entries off the original schedule that was copied.
Bulk Billing Medicare0