How to scan a document directly to a patient file
A document or multiple documents can be quickly scanned directly to a patient file, proving you have a TWAIN driver loaded for your scanner.
From Notes select 'Scan'.
The scan screen will display.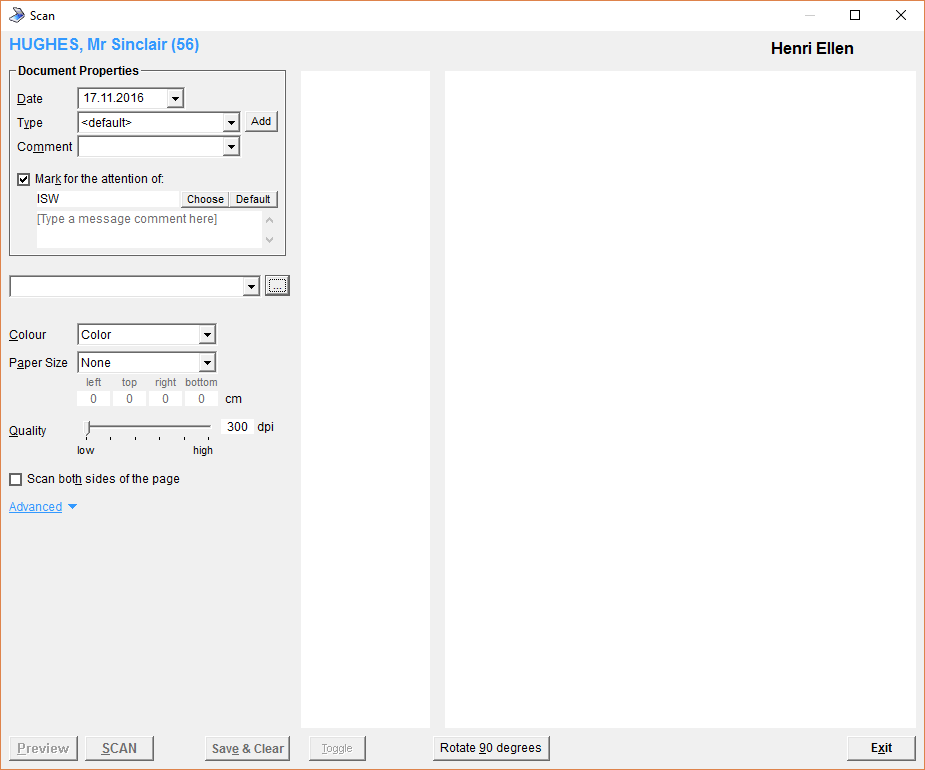
Set the document properties and change the scanner settings if required (see below).
- Select 'SCAN'.
- The document will scan and the thumb nails will appear on the screen.
- Depending on whether the document is set to 'Save to the patient's file automatically' either 'Save & Clear' and / or Exit.
- The scanned document will display in the patient notes.
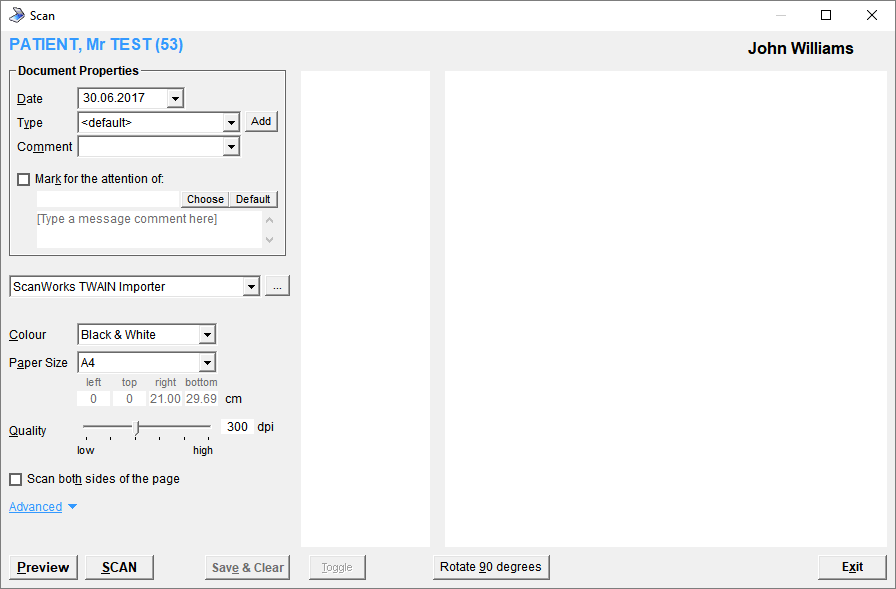
Document Properties | |||||||
Date | Defaults to today's date. | ||||||
Type | Select the sub-note type for the document.
| ||||||
Comment | In addition to the scanned document type selected, an optional comment can also be added. | ||||||
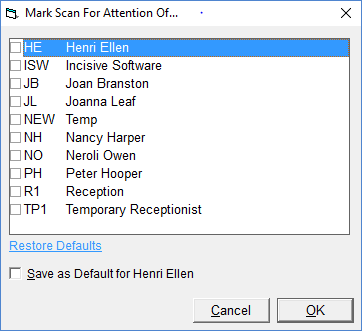
Mark for the attention of: | Check this on if you want an internal Message (F10) sent to notify either the Provider or another Operator of the document.
| ||||||
Scanner | Select the correct scanner from list.
Make sure that you have a TWAIN driver available for your workstation. WIA (Windows Imaging Acquisition) drivers may work but do not support duplex scanning or document feeding. If you have more than one TWAIN driver loaded on your computer a window will appear prompting you to select the correct driver for the scanner you are using. If there is only one TWAIN driver on your computer no prompt will appear. If you are running the Incisive application from a Terminal Server you may need additional software like RemoteScan or TSScan to allow a local scanner to work correctly. | ||||||
Colour | Select from:
| ||||||
Paper Size | Select the correct paper size depending on what size paper you are scanning. Select from:
With some scanner drivers, even though you are scanning A4 paper, the Paper Size needs to be set to None. | ||||||
Quality | Usually set to 200x200 or 300x300 dots per inch (dpi). This setting has one of the largest effects on the size of the image file. Try to keep the setting as low as possible whilst still keeping it legible. | ||||||
Scan both sides of the page | If the scanner you are using can scan both sides of one document during one pass through the scanner (duplex) and the document you are scanning has text on both sides of the paper, then this option should be checked on. In addition to this, you should check off the 'Save to patient's file automatically'. In this way, any blank pages can be removed before saving. | ||||||
Advanced | |||||||
Save to patient's file automatically | If checked ON each document will be automatically saved as it is scanned. Only one image will appear in the left hand column even if there are multiple pages. If not selected, all of the separate pages will appear in the left hand column as 'thumbnails'. You need to 'tag' each page you want to save by clicking on it with the RIGHT mouse button. Then select the 'Save' button. | ||||||
Use scanner's own control panel | This option should only be used where all other options to get the scanner working correctly have been unsuccessful. When 'Scan' is selected, the scanners own control panel will appear and the scanner can be controlled from here. | ||||||
Use document feeder | Use this option if your scanner can feed sequential pages through the scanner. If you have a flat-bed scanner without a feeder, do not use this option. | ||||||
Scan all images (for 'virtual' scanners) | This option allows you to use the 'Scan' function to view and retrieve existing images or scanned documents in a location (directory) without using the 'Scan' function to acquire the image from the scanner. You will need additional software such as Twain Importer from ScanWorks to make this feature work. The ScanWorks application can view and acquire images directly from Apple iPads and iPhones. | ||||||
Transfer images in 'Native' mode | This option is used only for trouble-shooting. | ||||||
Use shell scanning | This option is normally only used for Trouble-shooting, but some scanners may only work with this option selected. It calls a VB.NET program called TwainSPM.exe (written by Incisive) which uses the ImageMan.NET components to perform a TWAIN scan. It saves the images in a temporary file which is then read by the spm_ximagehandler to populate the scanned pages preview. | ||||||
Reverse scanned images | If the scanned document appears in the patient files as white on black (and not black on white), you will need to check this option on (or off if it is already on). | ||||||
Brightness | This setting can be in the range of -100 to 100. | ||||||
Contrast | This setting puts more or less emphasis between the text and the background. The range can be between -100 and 100. Usually the best setting is 100. This will make the text much darker. This is especially useful when scanning handwritten notes that might be quite light. |


Preview | Force the preview of a document |
SCAN | Initiates the scanning process |
Save & Clear | If 'Save to patient's file automatically' is not checked on, use this to save the 'tagged' scanned documents. |
Toggle | This button checks or removes the check from the scanned documents. If 'Save to patient's file automatically is enabled, this option will be dimmed as it is not required. This option is only used if Save Automatically is turned off. |
Rotate 90 degrees | If you are scanning pages that need to be viewed in Landscape, then this option will allow you to rotate the image. You will need to remove the check from 'Save to patient's file automatically' to allow you to rotate the image. Save the Image in its rotated format before exiting. |
Exit | Exits the scan screen and returns you to the Notes tab. |
Preparation of documents
Make sure all the staples and paper clips are removed and that the papers are not stuck to each other. If necessary fan through them to loosen them up.
The better quality 'document' scanners should be able to scan coloured paper without it becoming illegible.
Some hand-written notes may not produce a good quality image especially if it was written in pencil or with a red (or similar) coloured ink. YOU MUST CHECK THAT THE SCANNED IMAGE IS LEGIBLE.
Additional information
Scanned documents are automatically assigned to a particular patient during the scanning process and the image file is saved in the Provider's file directory.
Each image file (uncompressed TIF format) can hold multiple pages of scanned documents. This means that a patient's complete file can be scanned and all of the pages will be stored in one image file. This is only possible using scanners that have a document feeder.
There is also a similar scanning function in Patient -> Images. Often photos and other colour documents are scanned in this area so that they are included as part of the Images file for the patient.
Scanning problems can be notoriously hard to resolve. One of the best options we have found is to use a third-party application like Irfanview to attempt the scanning. If it succeeds then it is very likely that the Incisive product will be successful as well.
Download and install the latest TWAIN driver for the scanner. Make sure it is compatible with the Operating System version.