Bank Accounts
Setup - Financial - Banking - Bank Accounts
The Bank Accounts tab displays all bank accounts for all Providers.
From here you can add new bank accounts, edit the details of existing ones, and initialise the opening Cashbook Balance for each account.
You can also mark a bank account as inactive.
Add a new Bank Account
- Select 'New'.
- Complete the details as applicable for the bank account being added.
- Select 'OK' to save the new bank account.
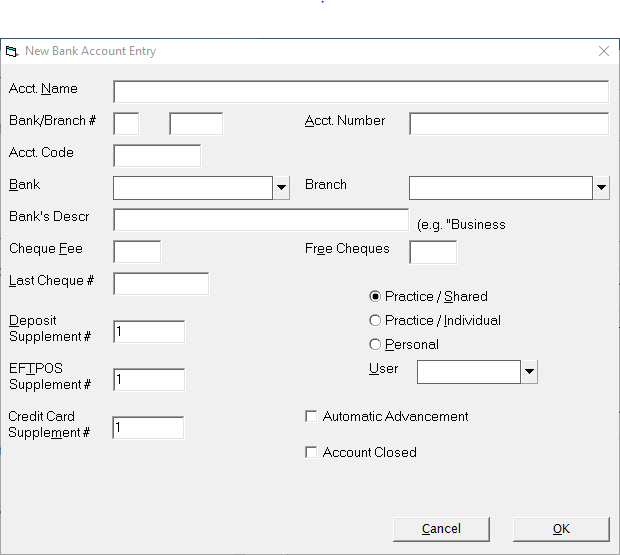
Account Name | Enter the bank account name as it appears on your statement or Cheque Book. | ||||||
Account Code | Enter a code for this account, set a shortened account name. This appears on a number of reports where there is not sufficient room to print the full account name. Normally this would be the Provider code and a number, i.e. ABC#1 | ||||||
Account Number | Enter the bank account number together with the account suffix. | ||||||
Bank/Branch | Enter the bank and branch numbers.This would normally be a two digit number for the bank and a four digit number for the branch.The BSB number is entered here, three digits for the bank and three digits for the branch. A combination of the data entered in the bank / branch (BSB) and account number fields can automatically be included on invoices for payments to be made by internet banking. Ensure that this information is entered correctly. | ||||||
Bank | Select the bank name from the drop down list. This will often be an abbreviation, i.e. ANZ, WP etc. The Bank (as selected here) will print out on the Deposit slips (together with the BSB and Account numbers). | ||||||
Branch | Select the branch from the drop down list. This would normally be the branch name and not a number, i.e. Collins Street. | ||||||
Bank's Description | |||||||
Cheque Fee | Obsolete | ||||||
Free Cheques | Obsolete | ||||||
Last Cheque # | |||||||
Deposit Supplement # | ? Obsolete | ||||||
EFTPOS Supplement # | ? Obsolete | ||||||
Credit Card Supplement # | ? Obsolete | ||||||
Account usage | Select from one of the following options:
| ||||||
User / Provider | Select the Provider the bank account belongs to from the drop down list. If the bank account is a shared practice account, the Provider selected should be the business entity and not an individual Provider. If necessary, speak to Incisive Software about having a Practice Provider that the bank account can be assigned to. | ||||||
Automatic Advancement | ? Obsolete | ||||||
Account Closed | If the account is now closed, check this option. The bank account will no longer be available for selection when entering receipts and expenses but will still be available for reporting purposes. |
Bank Branches
Setup - Financial - Banking - Bank Branches.
The sole purpose of Bank Branches is to speed up data entry when receipting.
Add a new bank branch
- Select 'New'.
- Enter the description for the bank branch.
- Select "OK' to save the branch.
- The newly added branch will appear on the list.
New bank branches can also be added at the time of receipt entry proving SELECTION LIST RESTRICTIONS as not been enabled.
Edit a bank branch
- Highlight the branch to change.
- Select 'Edit'.
- Change the description as required.
- Select 'OK' to save the changes.
Delete a bank branch
- Highlight the bank to be deleted.
- Select 'Delete'.
- Confirm deletion of the branch by selecting 'Yes'.
Banks
Setup - Financial - Banking - Banks
The sole purpose of the banks is to speed up data entry when receipting.
Add a new bank
- Select 'New'.
- Enter the bank.
- Select 'OK'.
- The newly added entry will appear on the list.

New banks can be added at the time of receipting provided SELECTION LIST RESTRICTIONS has not been enabled.
Edit a bank
- Highlight the bank to change.
- Select 'Edit'.
- Change the description as required.
- Select 'OK' to save the changes.
Delete a bank
- Highlight the bank to be deleted.
- Select 'Delete'.
- Confirm deletion of the bank by selecting 'Yes'.