Use the inSTOCK app to make the stock-take process easier
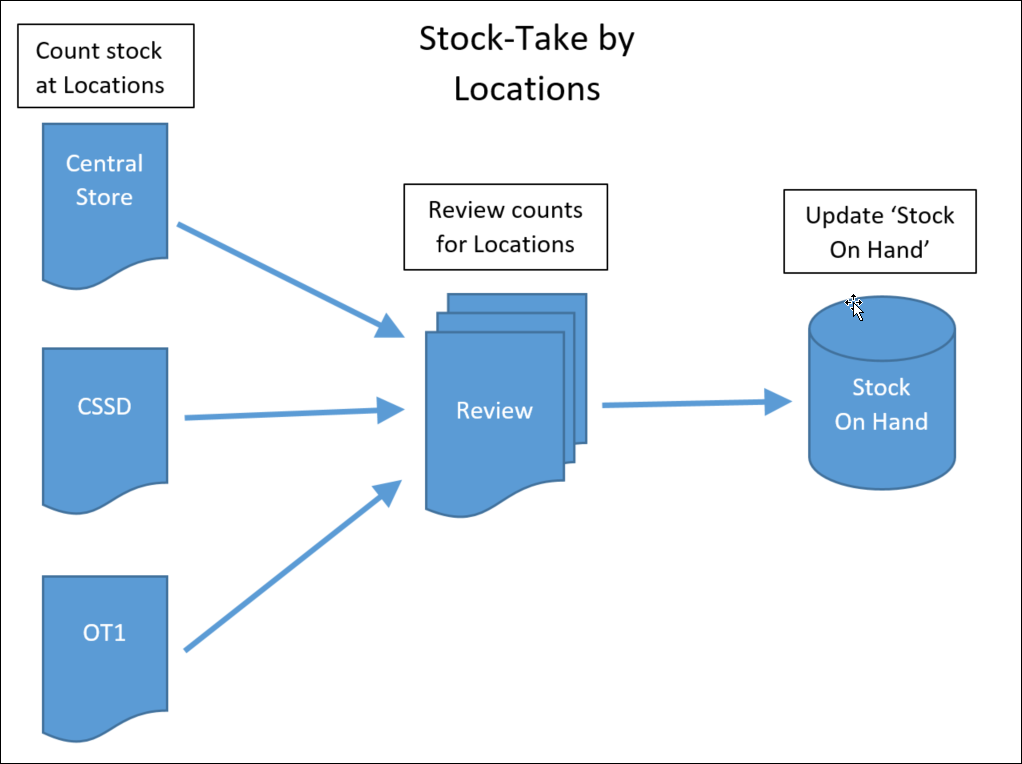
'Stock-take By Location' enables you to perform separate stock-take counts for separate locations, enter the count values, review the count values, then Process them to update the Stock-On-Hand, when you are ready to do so. If a stock item is stored in multiple locations, the application will merge the count values to get a total quantity.
The stock count, at each location, can be reviewed and adjusted prior to committing the totalled quantities.
Committing (processing) the totalled quantities can be performed after the official stock-take date. When you do commit the quantities you can choose the official date of the stock-take as an 'As At' date. Adjustments will be made to your current 'Stock On Hand' levels to allow for usage of items between the date that you did the actual stock-take and the date you committed or processed the location based counts. This means that even if you don't review & commit the location counts until a week after the date of the actual stock take, the program will adjust the stock-levels to be as if the counts were committed on the stock-take date.
Look to the online Help for more information.
Use the following link to see the step-by-step process and result
Example sequence of Stock-take by Location
Check you have the correct Pack/Item settings for the stock Items.
Purchase by Pack
Stock by Item
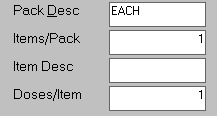
Dispense by DoseIf the item you purchase is the same as what you dispense e.g prosthesis, the setting would be:
If you purchase a pack or box that has 100 items in it, which you will dispense individually, the setting would be: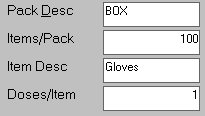
If you purchase a bottle of anaesthetic gas, which has 90 000 ml, and you are going to dispense on a per ml basis, the setting would be: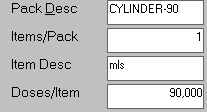
BE VERY, VERY CAREFUL USING DOSE/ITEM AS IT CAN CAUSE SIGNIFICANT ERRORS IN YOUR STOCK ASSET VALUATIONS IF NOT USED CORRECTLY. IF IN DOUBT, CONTACT INCISIVE
The Pack Description and Item Description text do help make the stock-take more accurate.
The Stock Pricing report can give you the best view of how you have configured your stock items.

Enter any adjustments for Broken/Expired/Wastage items into the Cost Centres.
Office > Cost Centres
If this is done after the stock-take counts are committed it will deduct items from the calculated SOH and therefore make your new stock-take levels incorrect.You do not need to reset any negative stock levels back to zero as the stock-take will adjust the quantity of the stock item.
- If you don't already have stock-take locations, create them.
Stock > Stock On Hand > Edit SOH Levels > by Location > New
A 'stock-take location' can actually be any 'group' or categorisation that you want it to be e.g. Clinical vs. non-clinical 'locations'.
The physical location of the stock item is recorded in the 'Storage Area' field.
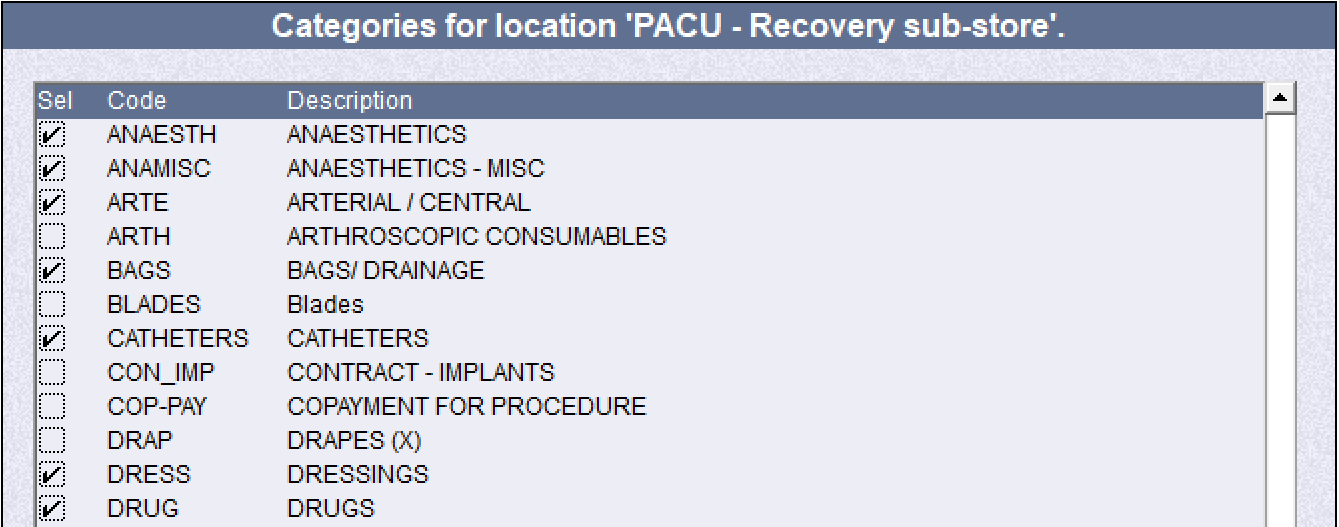
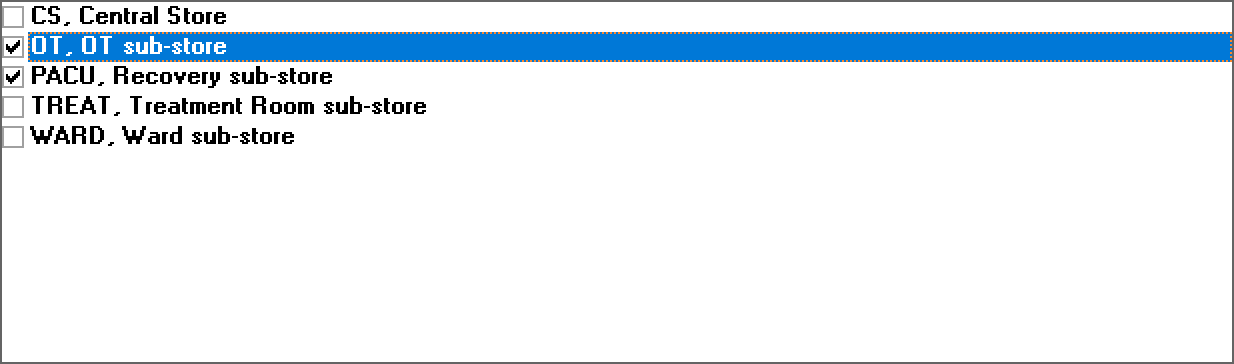
Optionally, choose the stock Categories that will be displayed by default when the Stock-take Location is reported (you can change the Category selection at the time of reporting) Print Stock-take Count sheets Stock > Stock On Hand > Stock-take Count Sheets
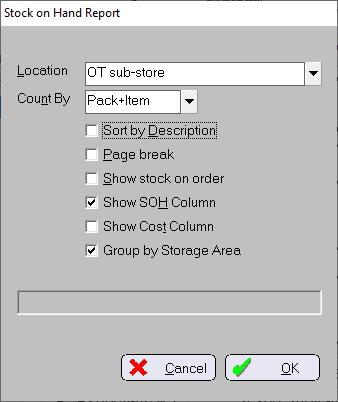
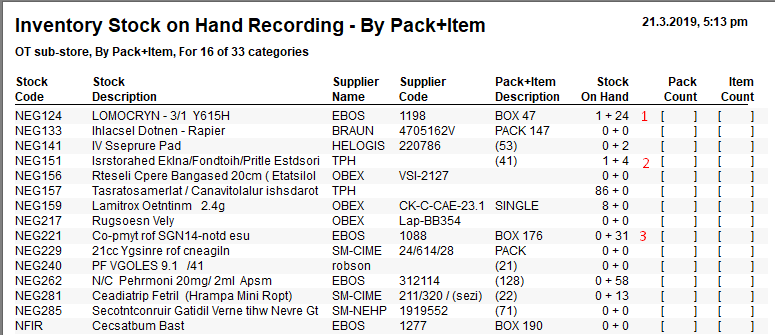
Choose your options on what you would like to include. If you include too many options the columns may not all fit on the page.1. '1 + 24' means 1 Box of 47 items plus another 24 items, so 71 items in total
2. '1 + 4' means 1 pack of 41 (no Pack Description) plus another 4, so 45 total
3. '0 + 31' means there are no full boxes, only a part box of 31 itemsAssign a count sheet, for a Stock-take Location, to a single staff member.
The risk of allowing multiple staff to do stock-take at the same time at the same location is that the stock might be double-counted. If necessary create more 'locations'.
Make sure the staff doing the stock-take understand that they are counting the item as it is stored, which may not be how it is purchased from the supplier or dispensed to the patient.
As an example:
The purchase may be a BOX of 100 needles but the usage will be EACH needle.
If the above BOX of needles is full, they could enter '1' into the Pack column, which indicates a stock level of 100 needles. If there is also a part box of 23 needles they can enter '23' into the Item column so that the total stock level is 123 needles. Alternatively, they could just enter the quantity of '123' into the Item columnEnter the draft Count values into the PHM application
Stock > Stock On Hand > Edit SOH Levels > By Location > select location > Edit Stock On Hand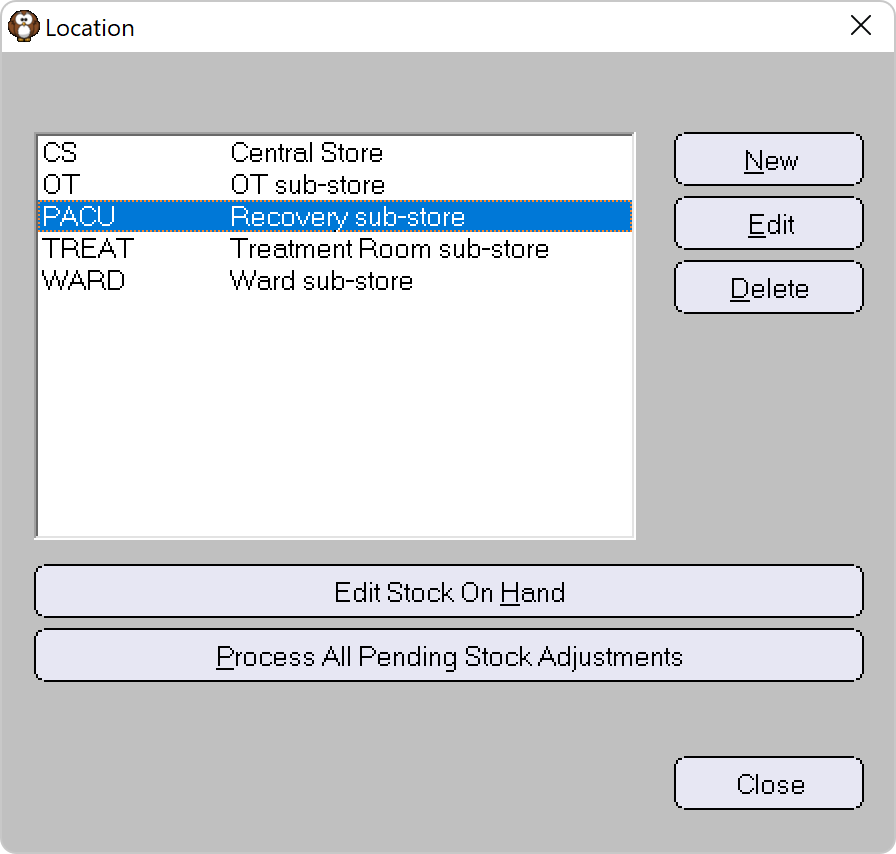
Default Categories should already be selected or you can choose alternative Categories
Enter the values into the Count column.
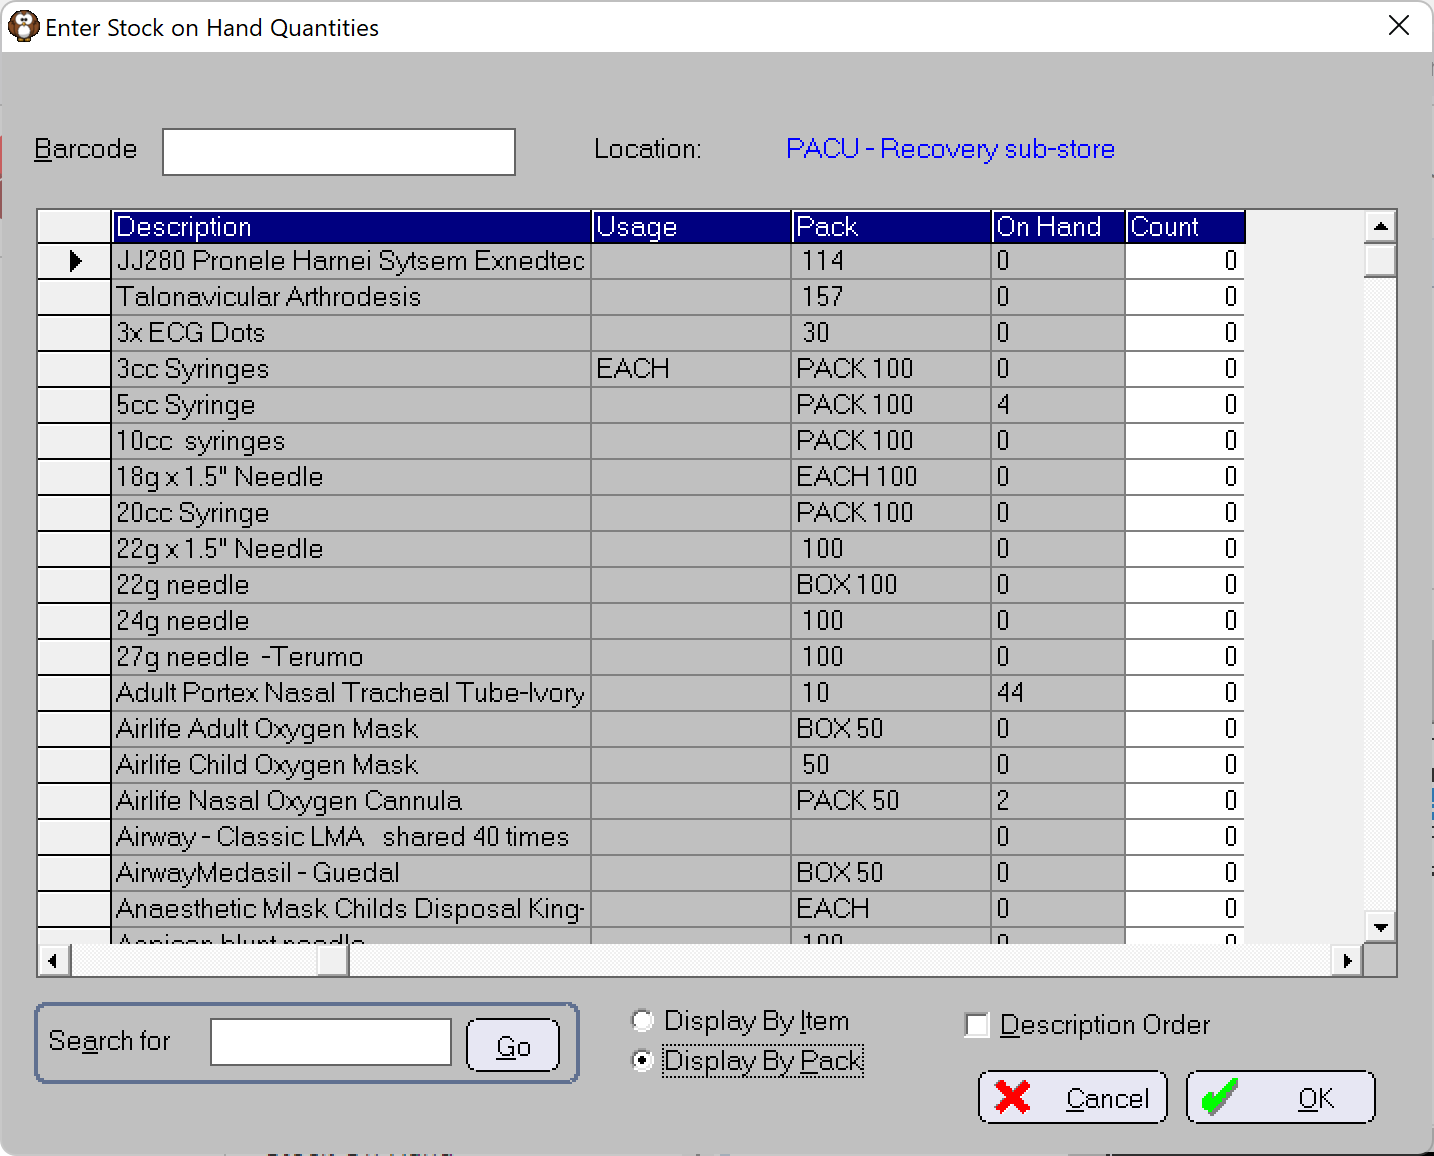
Zero '0' is the default value in the Count column. All items will have this quantity set if they are not updated with their actual count value.
Consider the quantities entered as PENDING or DRAFT because the actual SOH quantities for each item will not be updated until they are committed using the 'Process All Pending' option.
Using the above example, ensure the 'Display by Item' option is selected and enter in the Item count of '123'.
The BEST option is to use the rapid entry method of entering both the Pack and Part-Pack (Item) values, with the letter 'p' between the two values. For example, 1 full BOX of 100 needles and a part-box of 23 needles would be entered as '1p23'. This will expand, automatically, to a needle stock count of 123.If you choose 'Display By Pack' then the count value you enter is the number of Packs, not Items. You can't include values with decimal places.
DO NOT append the letter P to the numeral if you are using 'Display By Pack' as it causes the Pack value to multiply itself again.
If you have a portable laptop and a barcode scanner, you can use the barcode option to scan and find a stock item then directly enter the count value.
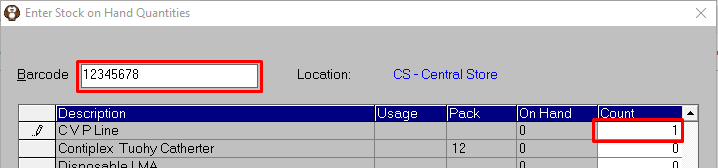
The item's barcode ID must already be in the Barcode field in PHM.
Make sure your power-settings are set to High Performance for networking reliability.
'Review' the count values
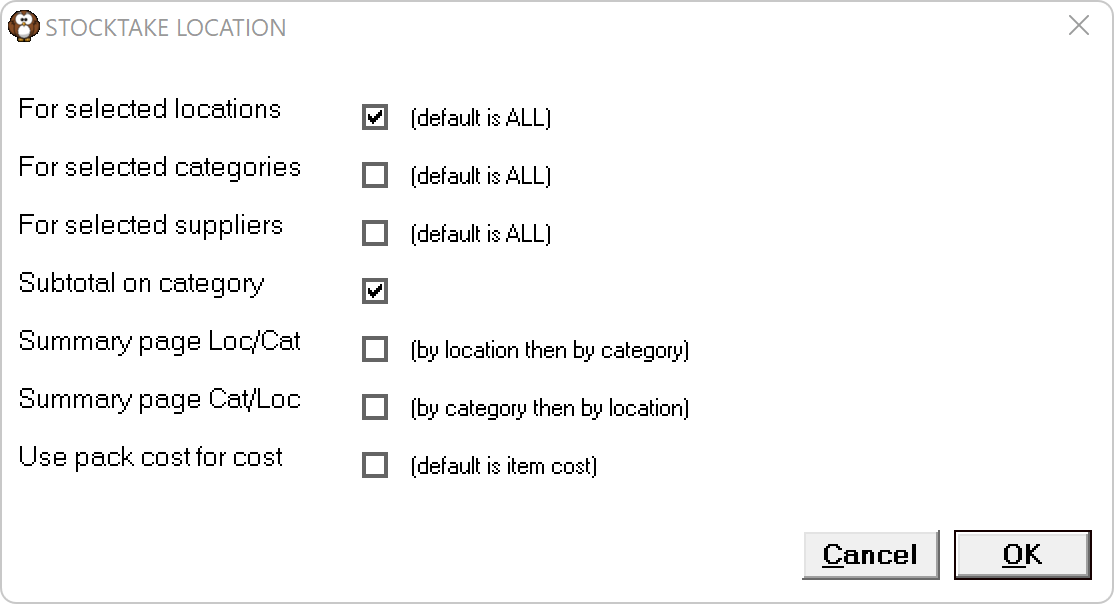
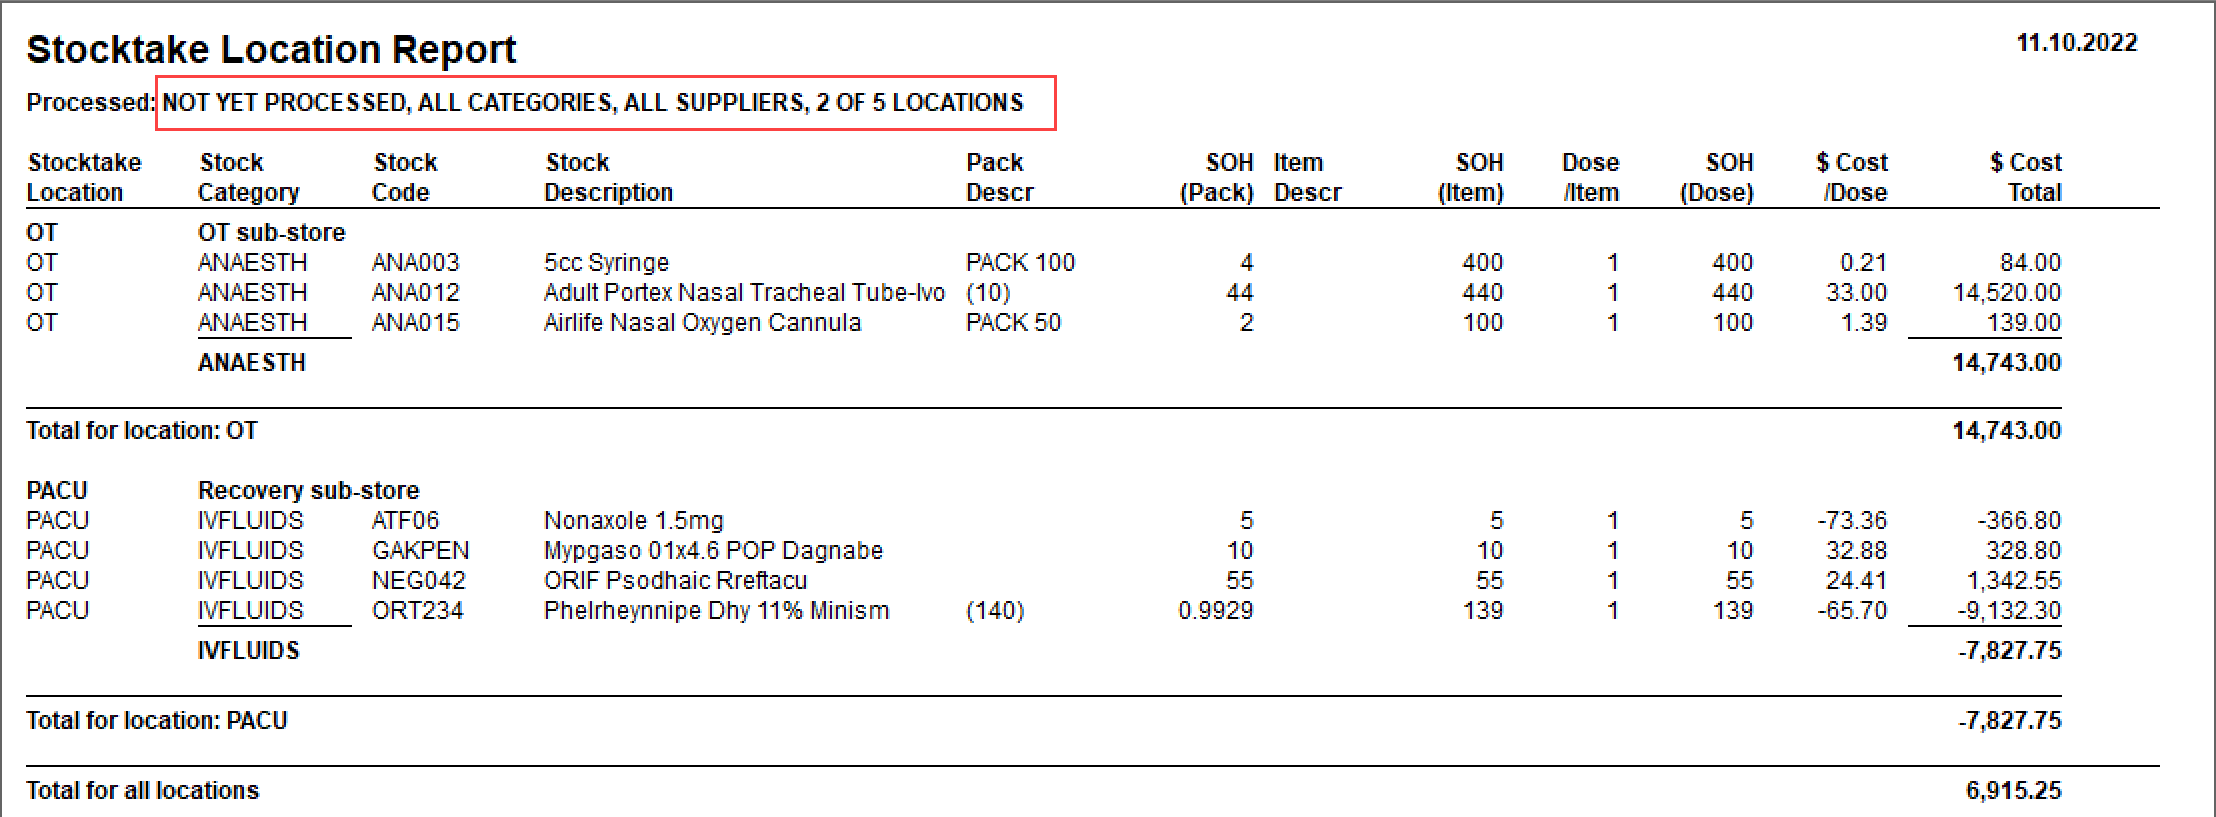
Before committing the values, print or view the Stocktake by Location report.
Stock > Stock On Hand > Stocktake by Location > select 'Not Yet Processed'
When values are entered into the Count column it will initiate the new DRAFT stock-take for the Location selected. This action will cause the new 'Stocktake' entry of NOT YET PROCESSED to appear in the list.
- Choose the items you want to review by selecting filter and grouping options
- Update any SOH quantities that are obviously incorrect in Stock > Stock-On-Hand > Edit SOH Levels > By Location
Repeat the above steps until ready to commit quantities as correct.
- Choose the items you want to review by selecting filter and grouping options
Commit the stock-take values using the 'Process All Pending' option.
Stock > Stock On Hand > Edit SOH Levels > By Location > Process All Pending Stock Adjustments.If the stock item is included in several different 'Locations' the count value at each Location will be added together to show as a total quantity in the Total Stock Cost reports or in the Stock-On-Hand fields for the item.
NOTE – THIS STEP CANNOT BE REVERSED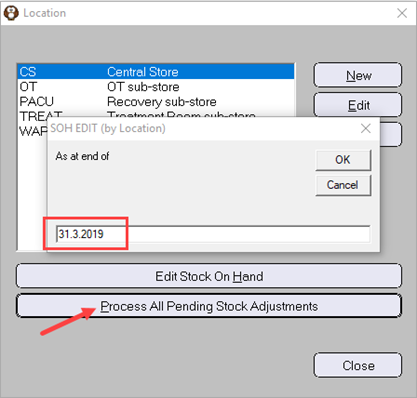
- Enter the 'As at end of ' date which is the date that you actually did the stock-take count e.g. 31.03.2019 (The 'As At' function allows you a period of time to check the count values before updating the actual stock-on-hand numbers)
Note – there is no message to indicate that the Processing has been completed - it can take some time to finish so don't turn off your computer until you can use the 'Close' button. - Use the Stock by Location report to view the stock-take count records that were committed by the Processing action.
Stock > Stock On Hand > Stocktake By Location > select the relevant stocktake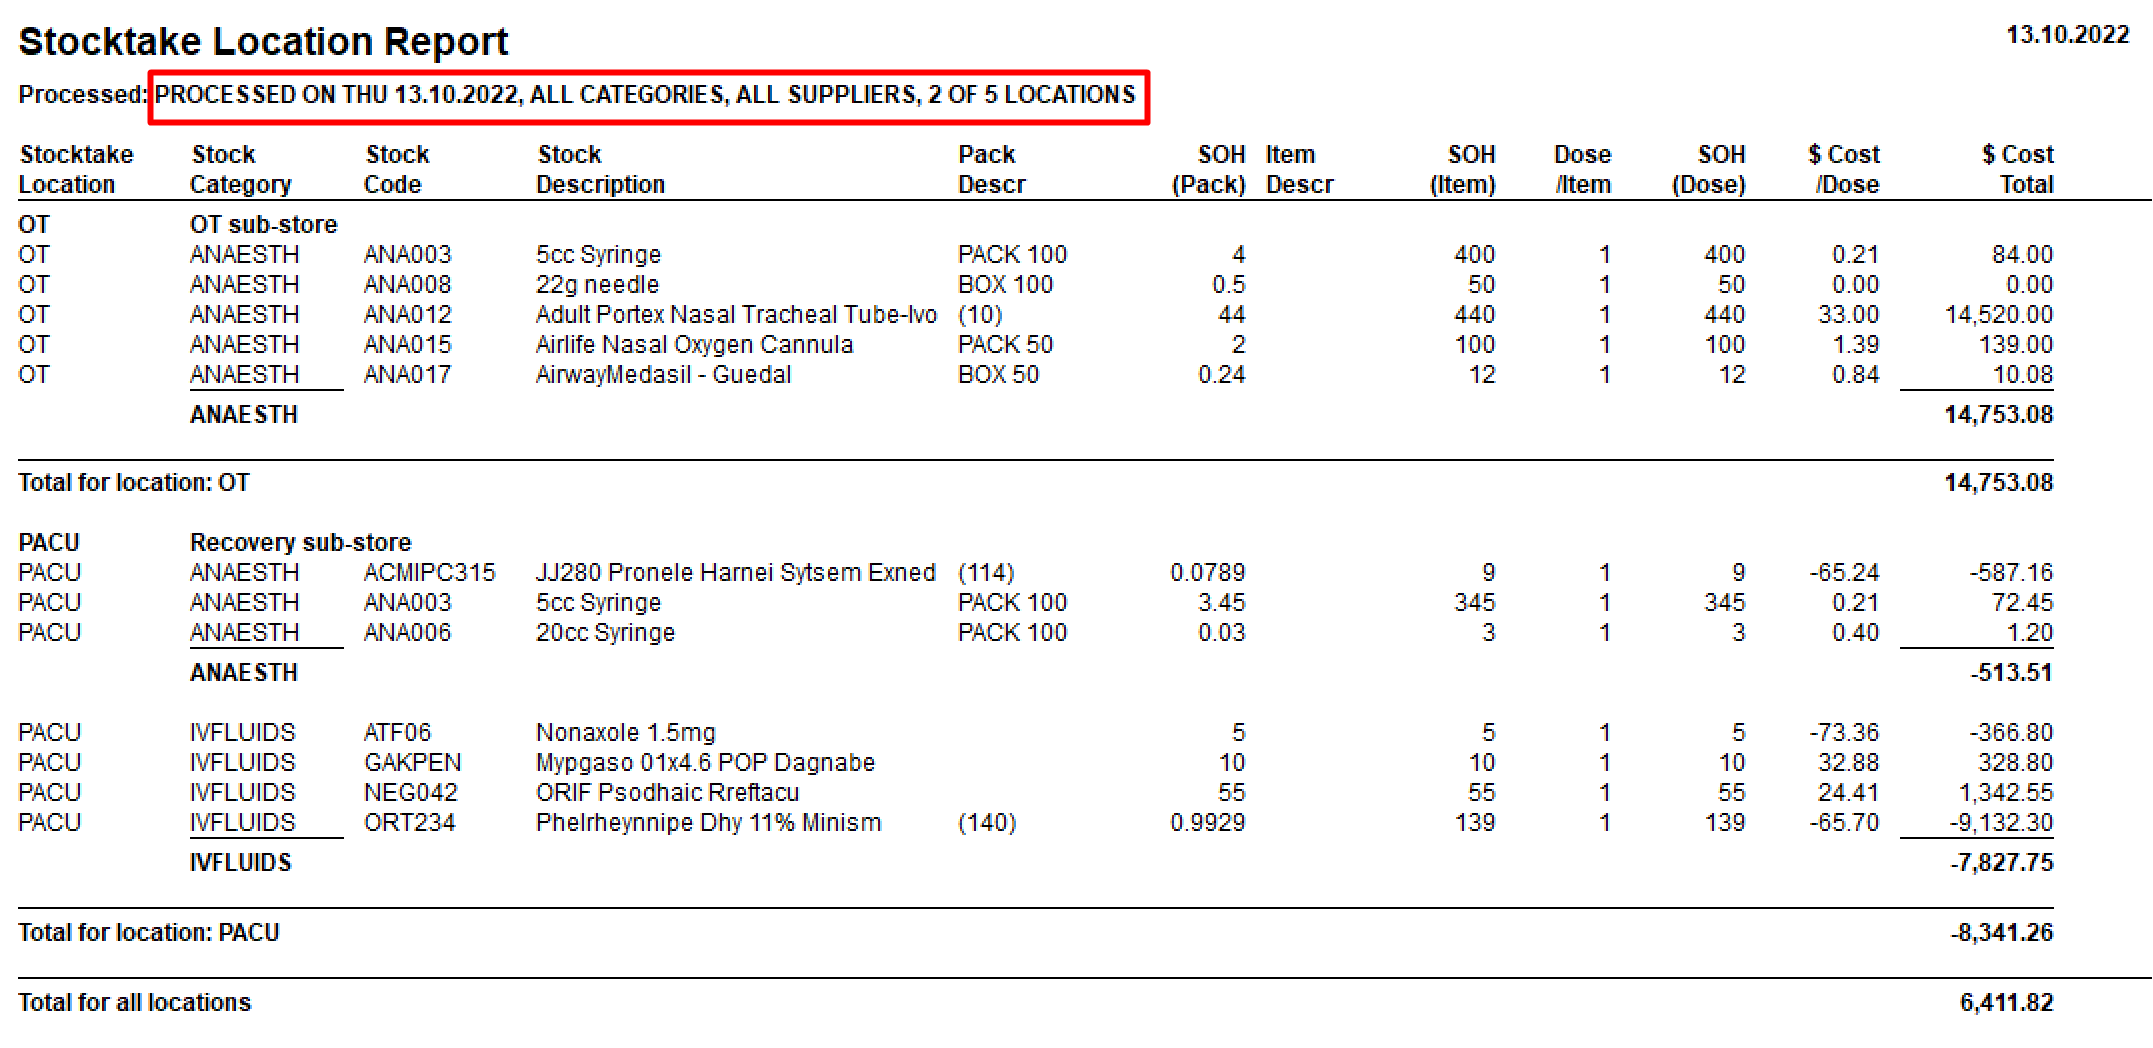
- Enter the 'As at end of ' date which is the date that you actually did the stock-take count e.g. 31.03.2019 (The 'As At' function allows you a period of time to check the count values before updating the actual stock-on-hand numbers)
- View the changes made to the stock items from the Processing event using the Item History report
Reports > Stock > Stock Management > Item History
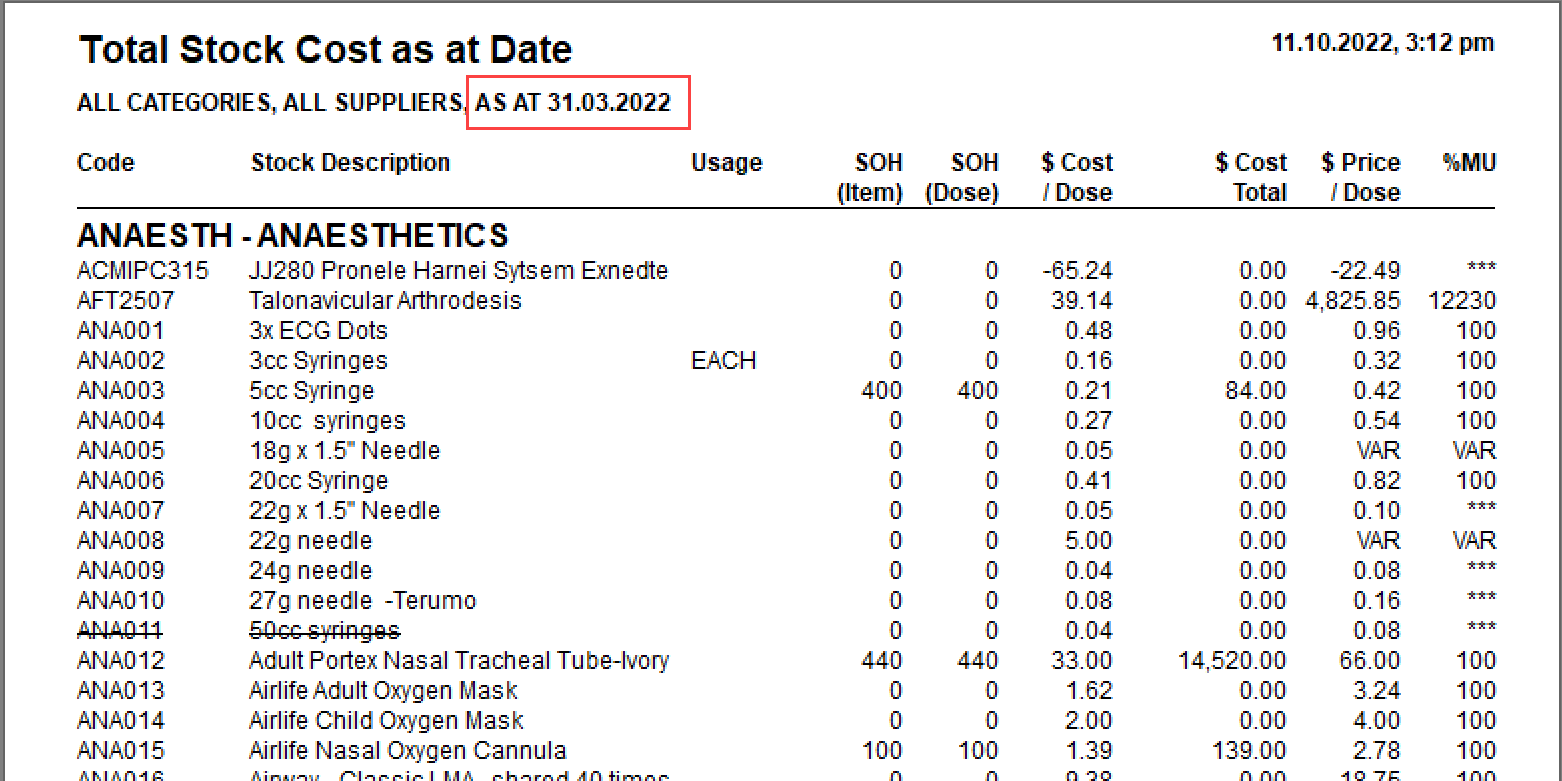
The updated quantity will appear as an Adjustment. - Report your stock levels and valuations using the 'Total Stock Cost (as at Date)' report.
Reports > Stock > Stock On Hand